

[ESP8266 HTTP Client] Pull Data From ThingSpeak And Custom Dashboard Look Better
♥️Hello my friends!♥️
In this previous post of this series. I have guided you create a free server on ThingSpeak and how to push data from sensor to this server. You can refer here Push Data To ThingSpeak Using ESP8266 to understand better!
I'll help you customize the observation interface on ThingSpeak look better and how to pull data values from server to ESP8266 device in everywhere with an Internet: 3G/4G - LTE/WiFi connection. Juts hearing that is exciting, right?
PART 1 : CUSTOMIZE DASHBOARD THINGSPEAK LOOK BETTER
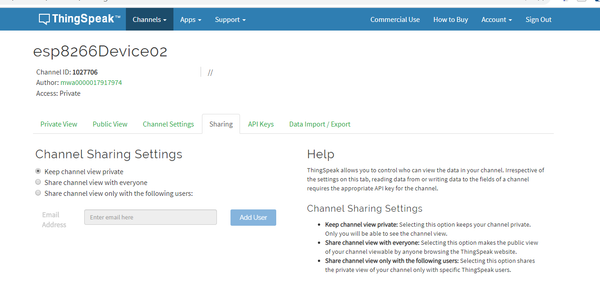
Step 1: Privacy Settings
Ascess Channel ThingSpeak created in this previous post, then select Sharing tab, this tab will determine the privacy of your data (the right to view).
- Keep channel view private: Keep private view.
- Share channel view with everyone: Everyone can see your data.
- Share chanel view only with the flollowing users: Share data access to certain people by Email.
You choose Share channel view with everyone then switch to the Public View tab
Step 2: Create a public display interface
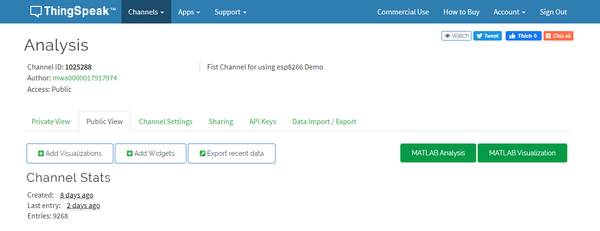
For Private tab, the previuos post we have researched, so I focus on guiding you to customize the Public tab for the purpose of the following post we do orther things, for Private tab is similar.
- Create a tracking chart, then choose Add Visualizations, website will open Field Data is the field you sent data from ESP8266 to here, you select the field you want to display, then click Save.

You can do the same with other data fields!
Step 3: Customize
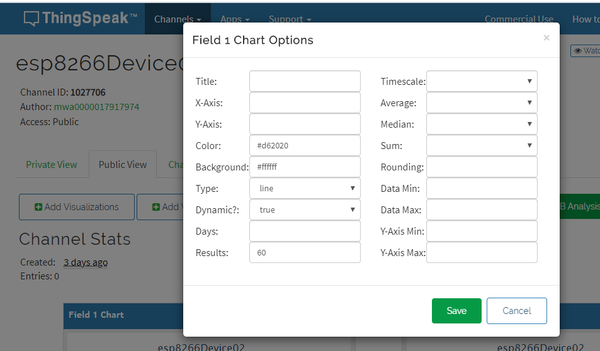
After creating a successfull chart, you select Options (pen icon) to start customizing the Dashboard.

There are many parameters to customize, I'll explain the common parameters that I usually adjust.
- Title: Name of the chart
- X-Asis: Custom border width X
- Y- Asis: Custom border length Y
- Color: Custom color of data line (color coding standard HTML, CSS, RGB, CMYK. You can refer here).
- Background: Custom background color (color coding standard HTML, CSS, RGB, CMYK)
- Type: Types of data line.
- Dynamic: Allow dynamic updates
- Result: Sampling Time (should be select 30 or 60 second).
Then click Save.
For the other tab, you can find out more to custom.
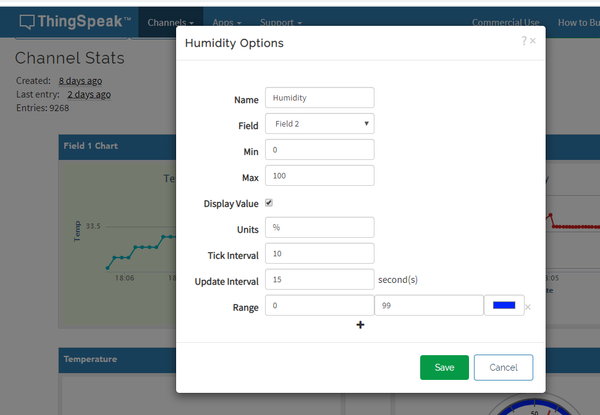
Step 4: Customize data monitor and gauge interfaces
In Public View tab, you select Add Widgets card, select Gauge and click Next to create new interface gauge format (normally used for humidity sensor).
You also click Options (pen icon)
- Name: Name of interface
- Field: Data field
- Min: Minimun value (enter 0)
- Max: Maximum value (enter 100)
- Select Display Value
- Units: Choose unit of data (with temperature is °C, humidity is %)
- Tick Interval and Update Interval (choose the default)
- Range: Data measuring range (I measured from 0 to 99)
- On the side there is a color picker, you choose the color for the measuring range
Then click Save
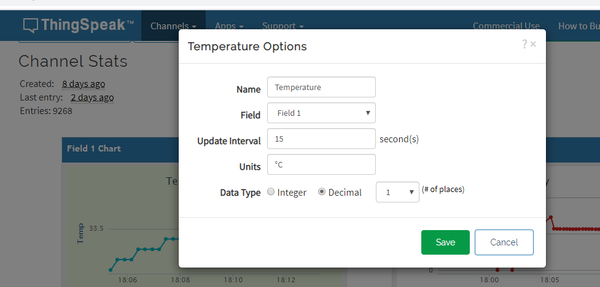
In Public View tab, you choose Add Widget card, select Numberic Display ad click Next to create digital screen interface (normally used for temperature sensor).
Continue customize parameters:
- Name: Name of interface
- Field: Field of data
- Update Interval (choose default setting: 15s)
- Units: Unit of data
- Data Type: You should choose Decimal and enter decimal units to be rounded off.
Click Save
After I tried to edit, this is the result 😍
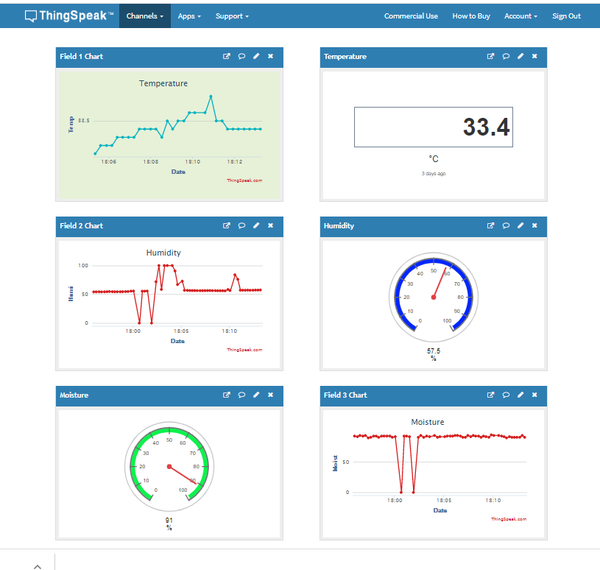
Looks more beautiful, doesn't it?
PART 2: PULL DATA FROM THINGSPEAK TO ESP8266 DEVICE
You prepare one more ESP8266 board, you can buy it here!
Download my sample code here: https://github.com/VVCi/ESP8266HTTPServer then open readDataSensor.ino file in Arduino IDE to build and upload code for new board. Sensor values derive from ThingSpeak will download and show in Serial/Terminal Monitor. And of cource this data will sync realtime throughout your sending and receiving system.
With sensor values take down, you can use LCD Text for more intuitive display. When I have more time, I will guide you to use more with these LCD Text.
In the following post, I will show you how to use the ThingSpeak cloud data to upload to Google Sites and create your own data monitoring website! It will be very interesting and interesting!
I hope this blog will help you. If you have any questions, please message me via Fanpage: EPCB or via Email: epcbtech@gmail.com. I wish you succcess!
Comment facebook